CREATE A MOODBOARD OF REFLECTION ASAP!!!

WHERE IS YOUR ANTONIO GUTIERREZ SECTION AND DISTORTED REFLECTION SHOOT. COMPLETE ASAP!!!
antonio gutierrez
Photographer Antonio Gutierrez is a very hard person to get any information at all, so instead of finding information on him, I've decided to show his images and talk about them. Below you will see three of his photos and then my opinion on them.
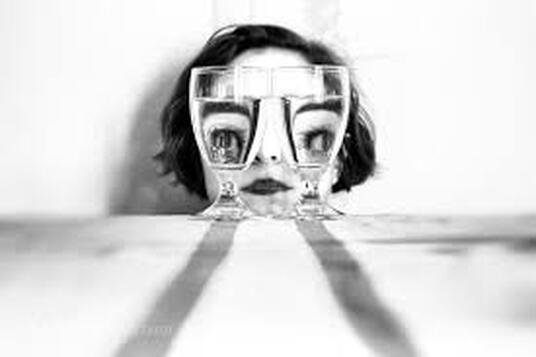
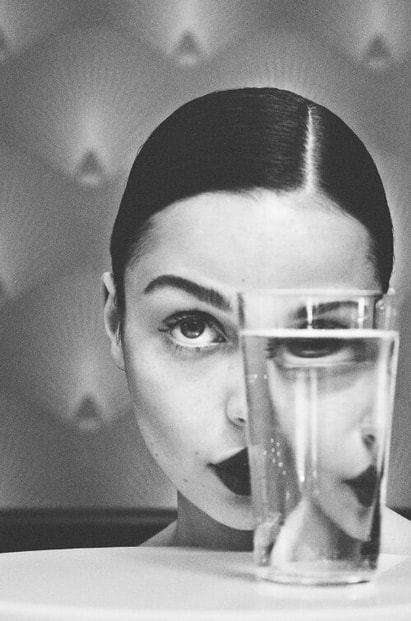
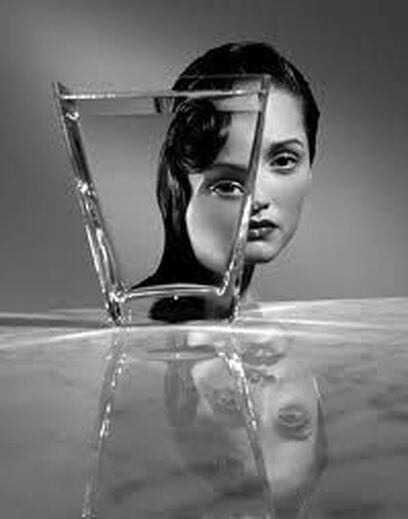
I personally really like Antonio Guirrez's photos for multiple reasons. One of those reasons is that the distortion effect that the reflection through the glasses creates. It creates an incredibly nice surrealism effect that makes the viewer feel as though they are looking into a dream pf some sorts. I also like Guirrez's choice of angle wile taking the photographs. A straightforward, head on image that really involves the viewer into the picture, as it almost like the viewer is looking directly at the model while she is being reflected.
Further below this, I post my own photos inspired by Antonio Guirrez's style of photography.
Further below this, I post my own photos inspired by Antonio Guirrez's style of photography.
reflections in mirrors
This section was inspired by photographer Sebastian Magnani. He was born in a small town in Canton Valais in Switzerland. He discovered photography while working as a media designer and in 2011 that he would become a professional photographer. He is now based in Zurich, Switzerland.
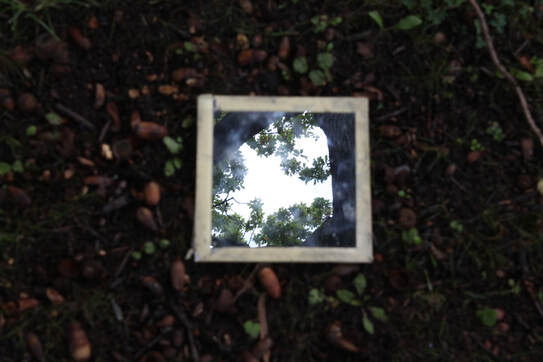
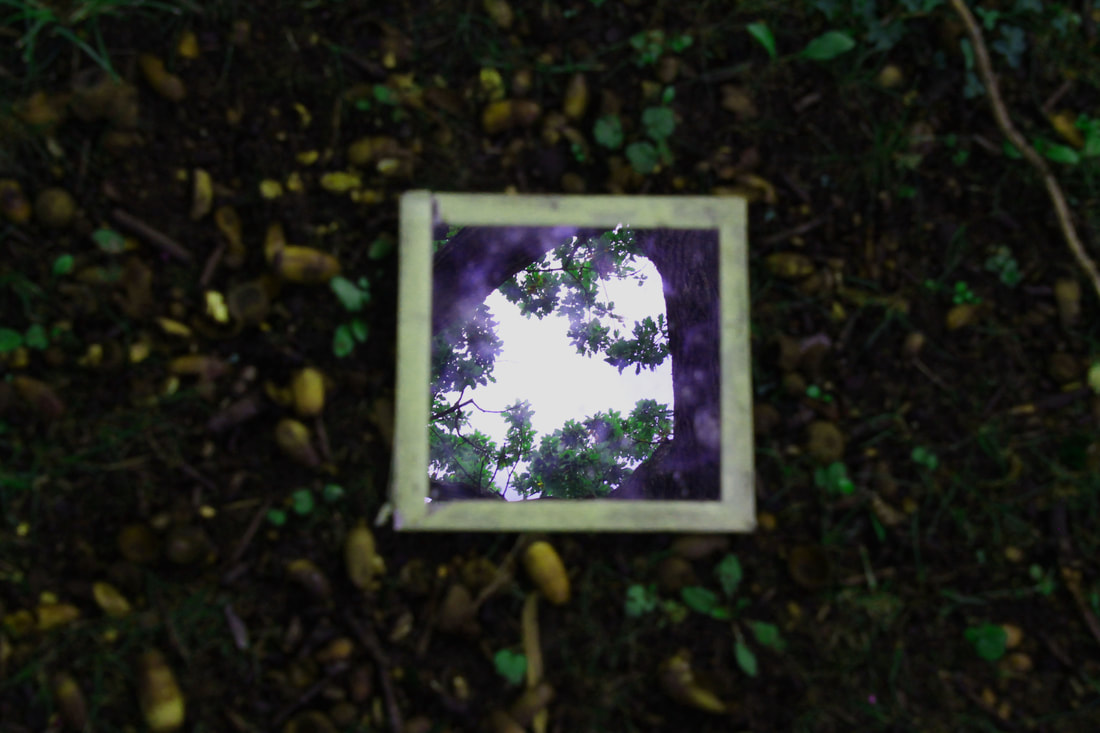
His photographs consist of him putting a round mirror on the floor somewhere in nature to reflect what is happening above the ground. He then takes a picture of the mirror with the floor visible around the mirror to create a contrasting picture with two different images in one photograph.
I really like his work as I find the surreal effect of his photos very effective. I also believe that there is a lot that you can take into your own work just by studying his images.
I, personally, will take a lot of inspiration from his photos. Mainly his idea of taking photos in Nature. I think that the variation of colours that you can find in forests or rivers, etc, is very inspiring and could definitely make for some very pretty photos.
GOOD DESCRIPTION AND ANALYSIS OF MAGNANI'S WORK.
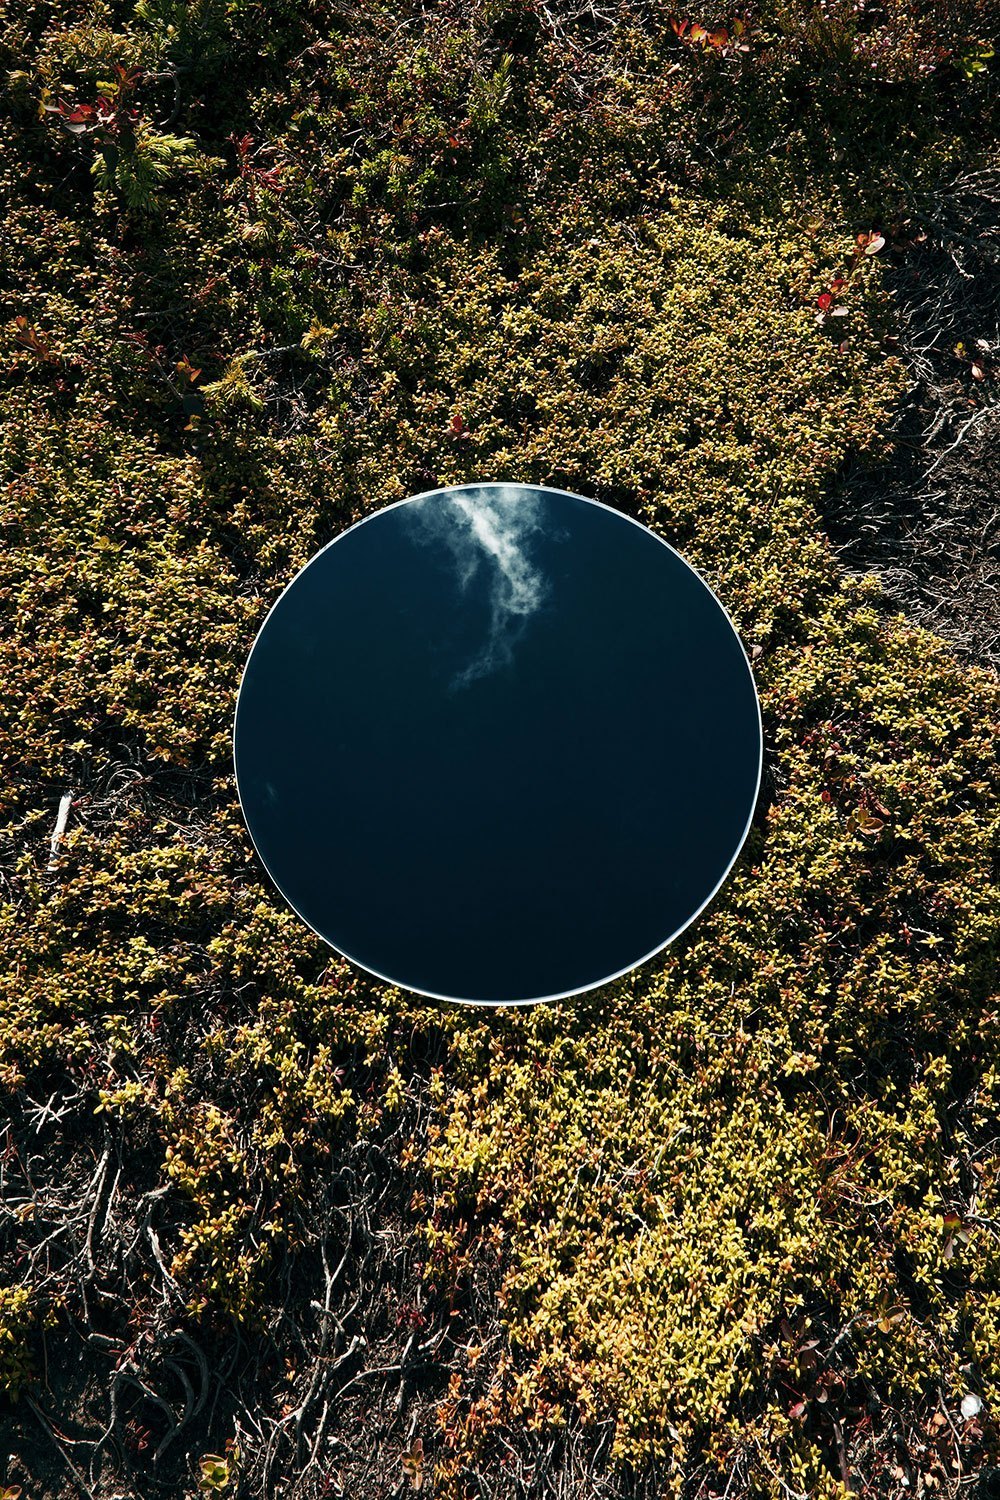
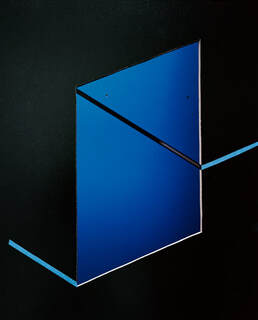
While looking at Magnani's photos, this one stood out to me for a few reasons. The first is the stark contrast between the stunning blue and the vibrant green. It's an image that really draws the eye. I think the amazing contrast between the two things also reinforces the surrealism of the photo. I also like the extra contrast of the shapes. With the round mirror and the rectangular shape around the mirror. It's quite aesthetically pleasing as the harsh edges of the rectangle almost soften the circles of the mirror. Those are the reasons that make this photo so great and why I especially like this photo from this project of his.
INTRODUCE YOUR SHOOT AIMS HERE
What I wanted to do with this shoot was too create a contrasting effect of the sky and the ground, like Magnani's work. I wanted to be able to see the duality of the sky, and the ground in one image and really be able to see how different two things on 1 planet can be.
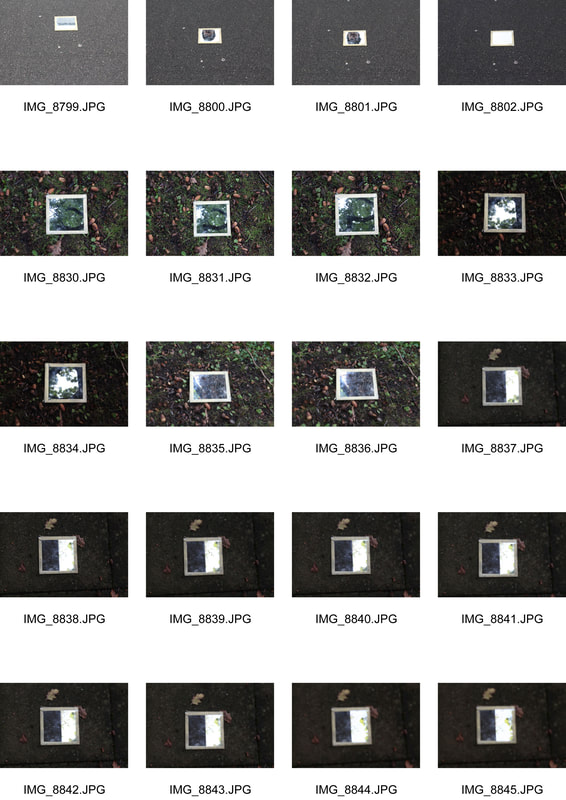
I enjoyed this shoot as it allowed me to take pictures while considering not only the ground but also the what was above to combine both to make a good picture.
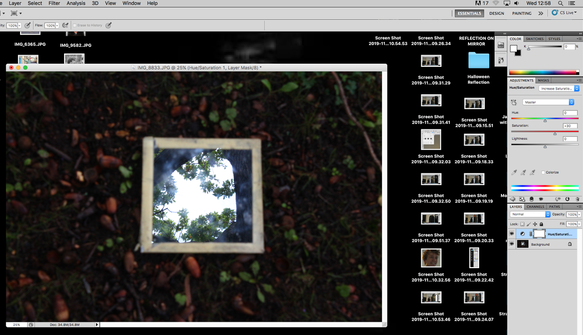
Below is my favourite photo from this shoot and the process I did in photoshop to make it look better.
Below is my favourite photo from this shoot and the process I did in photoshop to make it look better.
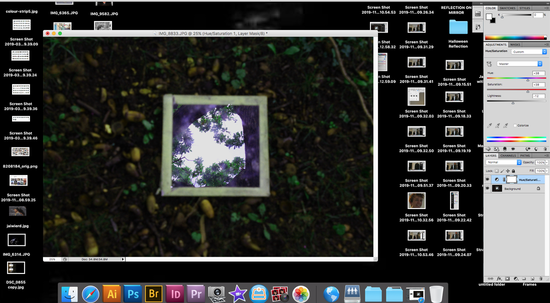
Original:
Photoshop:
Photoshop process:
Once in photoshop, you want to open the menu you see to the right. It's the menu with the option to change saturation and lightness.
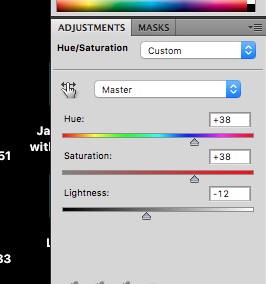
When you have this table open, you need to choose the amount of hue, saturation and lightness that you are happy with.
Make some last minute adjustments that you believe are necessary until you are happy with what your photo looks like.
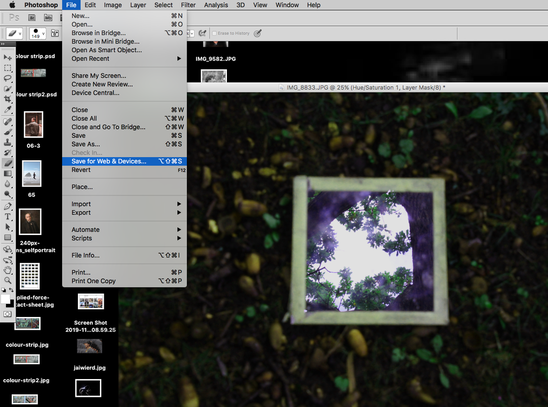
Once everything above is completed, don't forget to save the image for web and devices!
FREDDIE - WHERE ARE YOUR 3 ENLARGEMENTS AND PHOTOSHOP PROCESS YOU MENTION?
The reason I like this photo so much is because the contrast is particularly effective as you can clearly see the sky and trees, in contrast to the nuts and branches on the ground. I believe this photo represents Magnani's idea very well.
reflection of colour
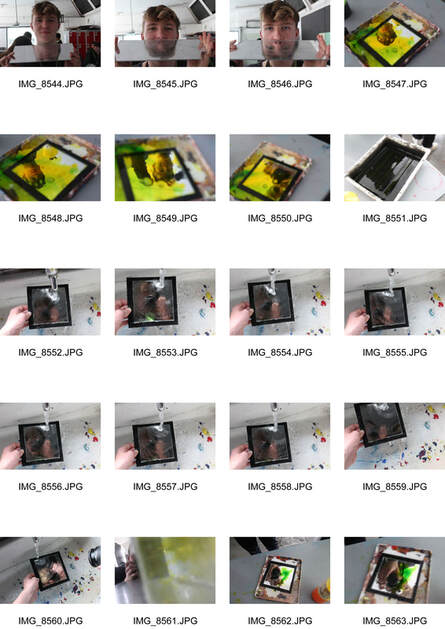
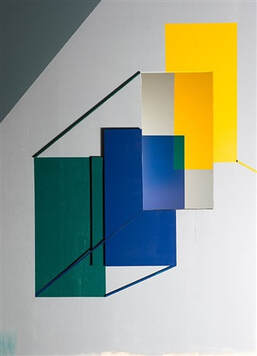
This project was more arts and crafts then actual photography and I think that this was one of the reasons that I didn't enjoy doing this as I myself am not a very arts and crafty person. Below is my attempt at the reflection of colour project. I believe that, considering my total uselessness at arty things, this actual turned out to be okay and decent looking, although I have to admit that I maybe could've added more things to further the effect of reflection of colour.
Tamara Lorenz:
|
|
Tamara Lorenz is a photographer who specialises in colour reflection using daily paper and sometimes mirrors. Unfortunately, very little is known about this photographer, however what we do know is that Tamara was born in 1972 and that she mainly shows her pieces of art at German galleries, so we can infer that she either lives or was born in Germany, or both.
While I appreciate that these photos and pieces of art are skilfully created, I did not particularly like it as I found the similar shapes and patterns boring and repetitive. I also found that the colours used by the artist often clashed and made the piece of art less enjoyable.
While I appreciate that these photos and pieces of art are skilfully created, I did not particularly like it as I found the similar shapes and patterns boring and repetitive. I also found that the colours used by the artist often clashed and made the piece of art less enjoyable.
Below this are my three strands that I developed for my three strands for reflection. Then even further below that is my final strand that I developed as it was my favourite to take photographs for/edit for.
genetic reflection
For this strand, I wasn't really entirely sure what to do or how to do it. I originally wanted to get a person and an ancestor, but I eventually decided that it was too complicated and would take too long to do, so decided to just use photographs instead. The result wasn't entirely what I wanted and to be honest, of all the three strands, this was my least favourite. And while Tom Hussey inspired me, I didn't want to make photos exactly like his, in fact my final pieces look more like Tom Hussey inspired photos then these.
Tom Hussey:
Tom Hussey is a photographer that has inspired the photos that I took above. I found his idea original and entertaining and it made me really want to try out his ideas. I found the whole process fun and I learnt how to do a lot of things on photoshop that I didn't know how to do before. Above I explained how to achieve the effect that Tom Hussey and I managed to achieve. Below are some examples of his work.

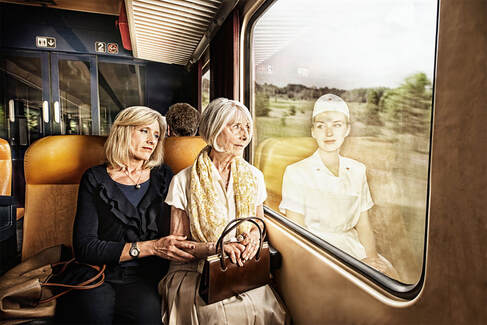
I really like these two photos in particular for many reasons. The photoshop work is flawless, especially the photograph with the reflection in the window, which is transparent. .It gives a ghostly effect, a vision of the elderly woman's lost psst, which, perhaps like the train journey itself, has flown past.I also like the expressions of the woman and the man. Who do they see in the mirror? Their younger selves or the older them?
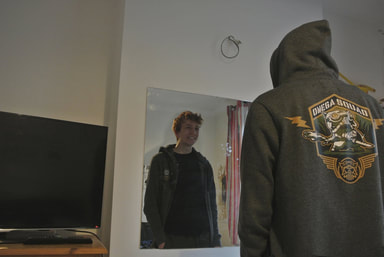
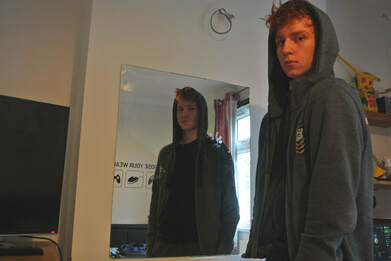
Reflection of inner self (halloween theme)
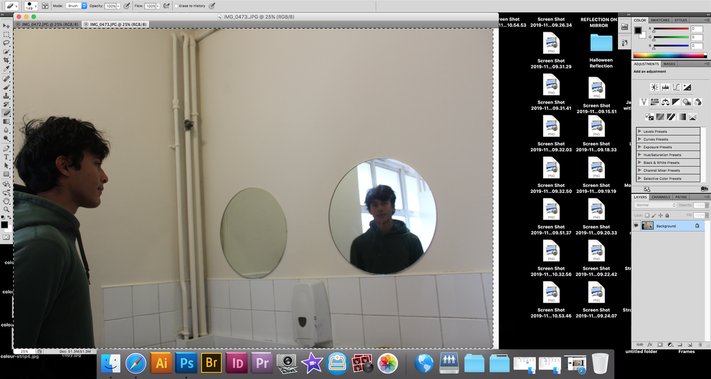
We did this in class as a group but as I liked it so much I decided to include it as one of my three strands. As this was taken on Halloween, it of course had to be Halloween based! That is why my teacher provided us with creepy masks that were supposed to represent a scary inner part of us. This was a really fun photography and photoshopping process. Below you will see my final photo from the day.
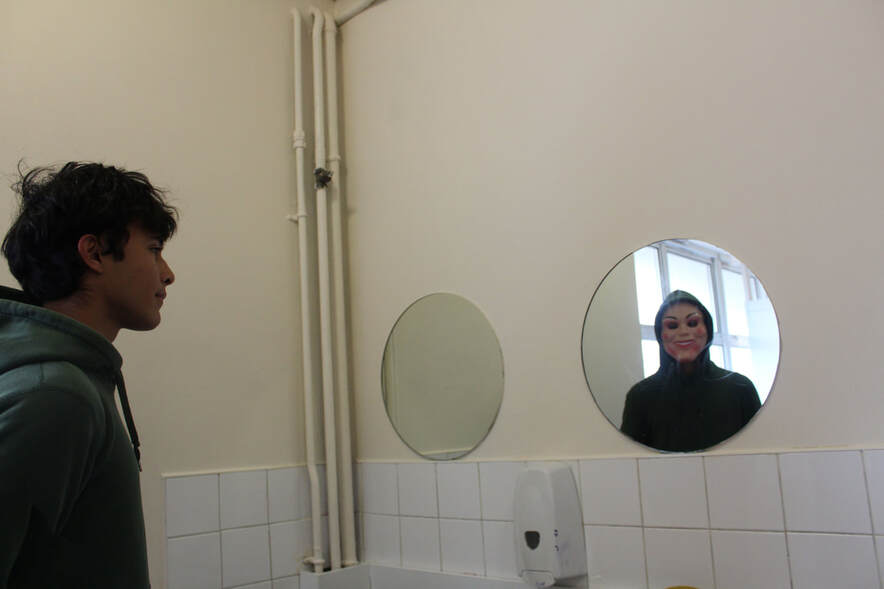
To achieve the effect of having a different selection to what the model actually looks like, you need to work in photoshop. You can see my process along with annotations below.
The first thing to do in the photoshopping process is to copy and paste one of your images directly over the other so that once you start erasing part of the top photo, the other photo will show through.
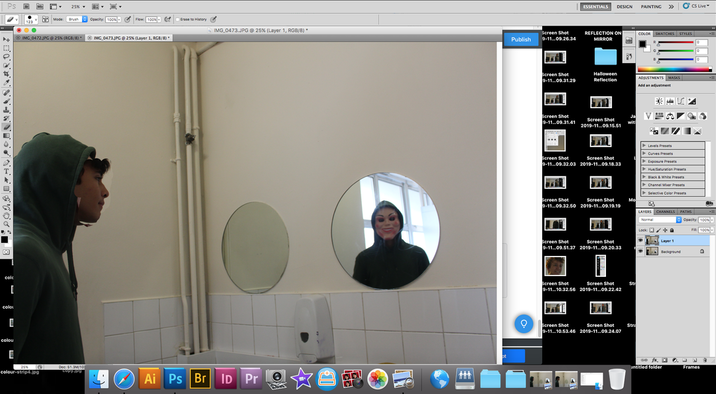
As you can see, once you select the rubber tooling erase the part of the photo where you want the image underneath to show, it will come through!
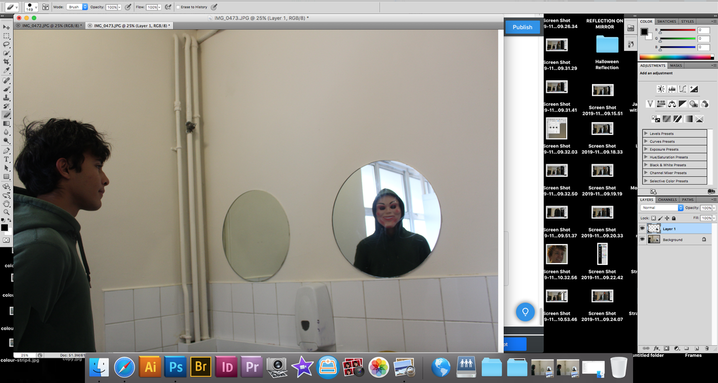
You then need to erase the rest of the image and make sure that there are no loose ends and that the image looks clean.as shown above.
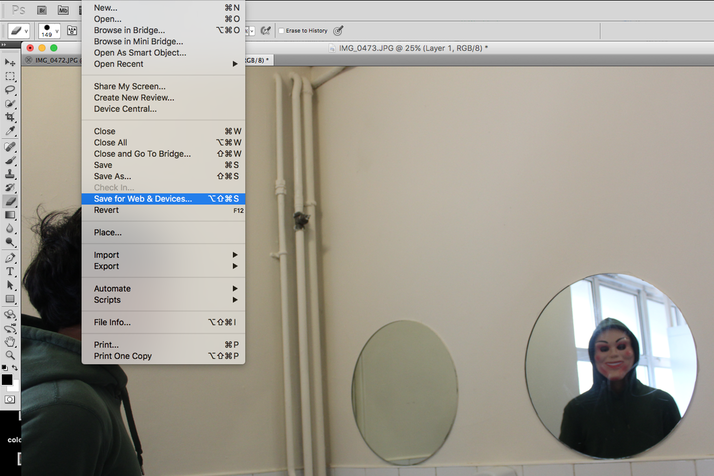
Once you're confident that it is how you want the image to look, you save it for web and devices to upload the image! Or you can just save the image as if you don't want upload the image online.
mood swings
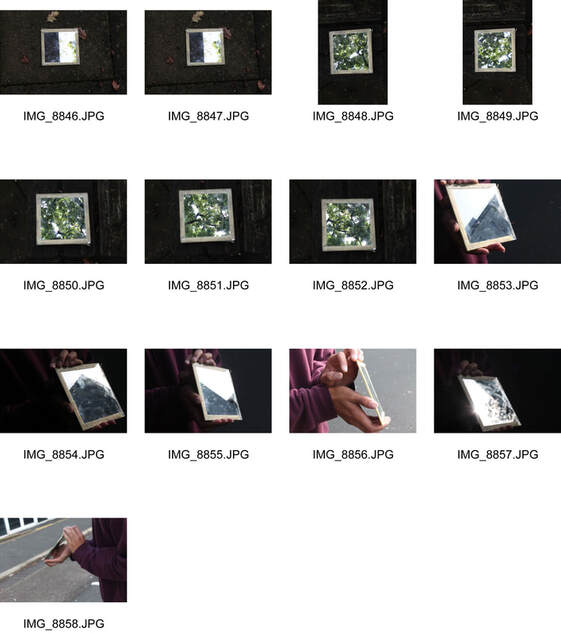
This strand was incredibly experimental and I wasn't entirely sure what to do, I juts liked the idea. However I eventually decided to do it like I did one of my favourite strands from a previous project, the movement strand. (Check Force project.) I quite enjoyed this as I enjoy this type of photoshop, It was also an opportunity to do self-portraits, something I'd never done before! A disclaimer, this was an idea I came up with by myself and therefore I couldn't find an artist to take inspiration from. However if you are hard pressed to seen artist similar to this style of photography, I again refer you back to the force project and my movement strand.
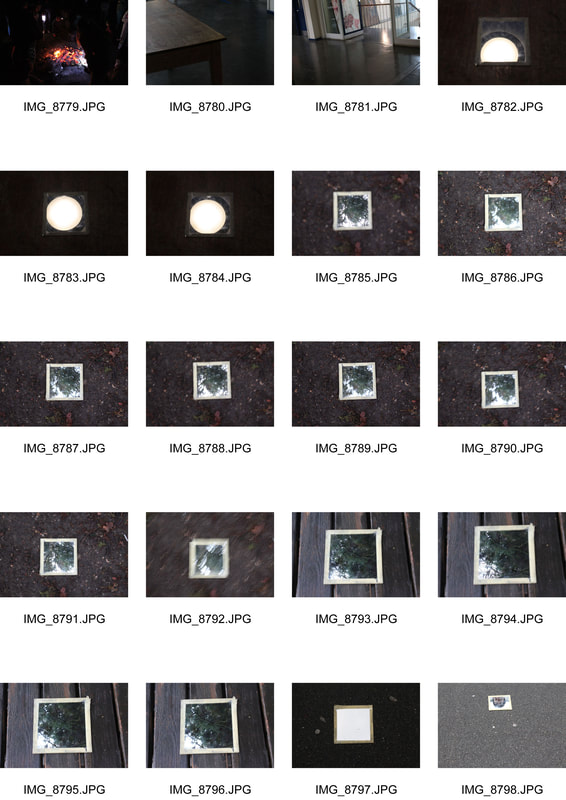
olafur eliasson exhibition
Two weeks ago, I wet with my mother and a friend of mine to the new Eliasson exhibition at the Tate Modern. This was one of my favourite exhibitions that I'd been too and as there was a lot of reflection I this exhibition, I've decided that I'd show you how cool and fun this exhibition was. Below are photos that I took of the exhibition. To make this easier to navigate, I've separated different photos into different sections for each part of the exhibition.
First Section:
This was the first thing you saw as you walked into the room. The effect of the waves created a really cool and trip effect.
Second Section:
I really liked the effect of the shadow reflection of the window with the yellow outlining other people's shadows effectively. it presented many interesting photography opportunities.
As you walked into the next room, this interesting oval window showed that distorted different reflections and was really funny to look at people through. I also took video of this but I am unable to upload this unfortunately.
Third Section:
In this room, there was a room with a mirror directly above the room. This was a really cool room and was a fun photography opportunity.
Fourth Room:
This room was shown on the poster advertising the exhibition and it was a really cool room with an incredibly interesting effect with the different colour shadows. I ended up taking multiple pictures of this room!
In the next room, there were two things. 1 of these things was a corridor covered in different refractions of mirror that made you see yourself all over the corridor. It was really cool and again there were multiple photo opportunities. In the same room there was a mirror that was designed in the same way as the corridor and when the light came through it, it gave a nice look so it looked almost like the sun.
This colourful mirror changed colour as you walked past it. It was cool.
This room was by far my favourite and I'm disappointed that I didn't take more pictures in this room. It was a long corridor filled with sugar smoke (I'm not sure what it is called), that changed colour the further you went down. My friend and I spent about half an hour in this corridor alone.
final piece
For my final piece I decided to develop the inner self strand as I really enjoyed doing something different to what I was used to. However this time I wouldn't make it Halloween orientated. Below are my responses to the artist Tom Hussey whom I talked about at my first strand.
First Responses:
For these photos, I was exploring what I could do exactly with this strand and was mainly easing myself into the photography process of taking photos and photoshopping.
Second Response:
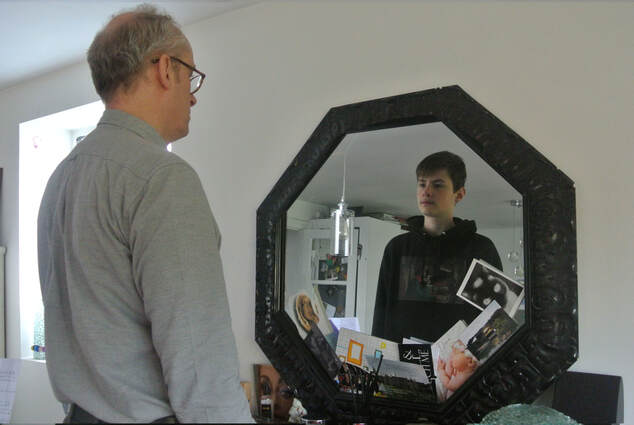
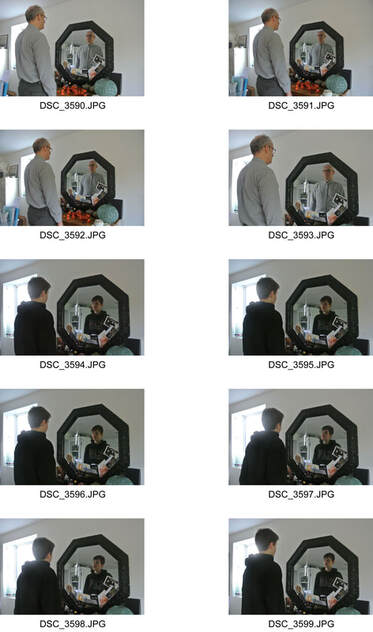
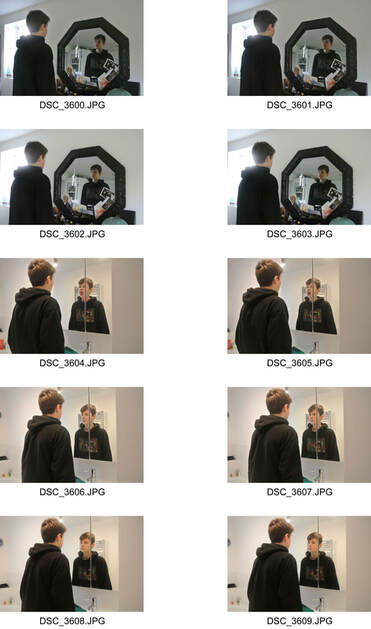
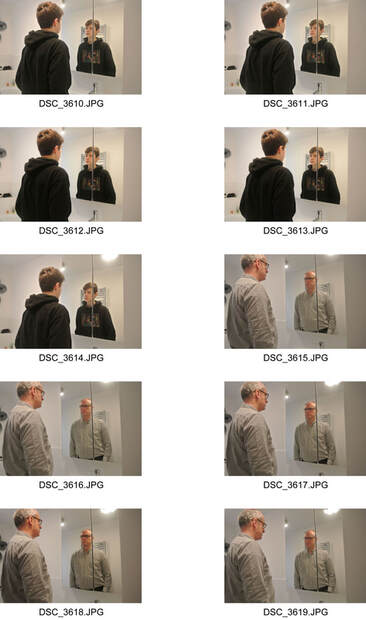
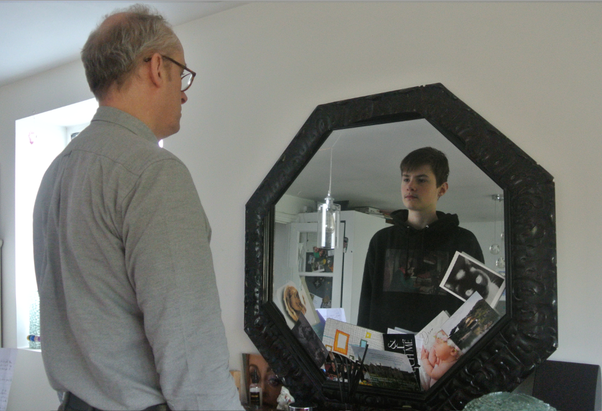
For my second response, I used my father with these mirror reflections and I decided to do something similar to the genetic reflection that I did above. I tried to put myself in my father's reflection, shifting the notion of time and person. This could come across to the audience in different ways, either me being an image of his younger self or him looking down at the next generation. It was a fun way off creating an image for this strand.
Contact Sheet:
Contact Sheet:
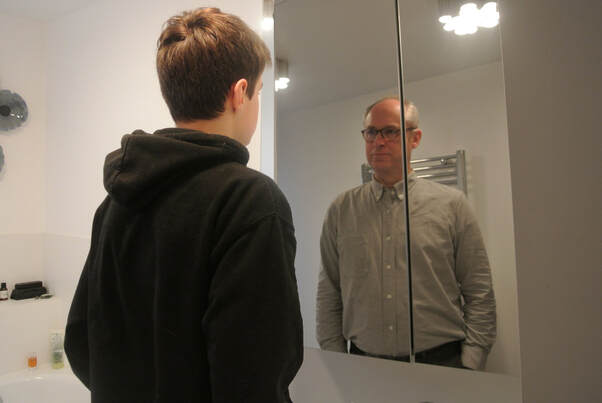
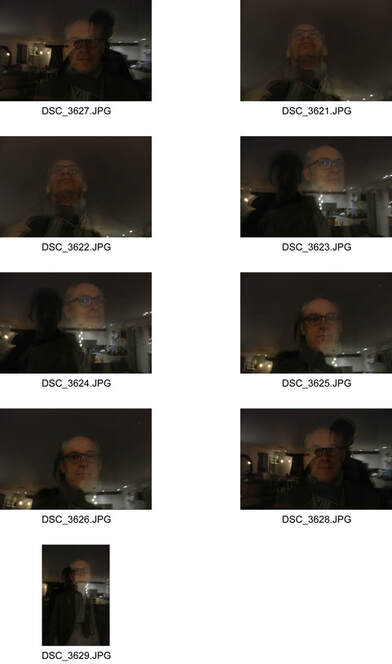
Third Responses:
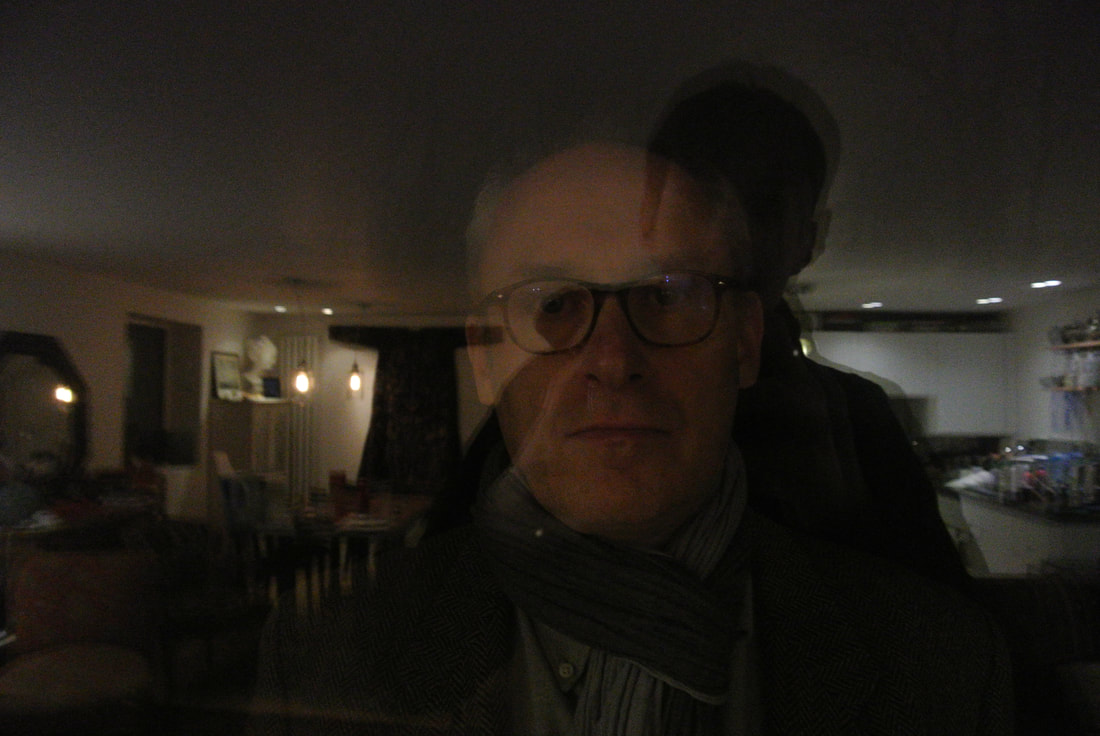
For my third and final response, I wanted to try something different to what I had done multiple times with the previous tries. I wanted to create a reflection of two people's faces without using photoshop. So what I did is when it was night time, I made my father go outside and look into my house through some big windows that I have at the front. The house was brightly lit inside which meant that you could see the person outside clearly but also see a dark shadow from the person inside across the image. It created a very ghostly and surreal effect with many overlapping realities. I was rather happy with what I'd produced.
Contact Sheet:
Contact Sheet:
www: What went well was that I was able to explore different ways to complete this particular strand that created ghostly and surreal effects, which is what I was striving to do from the beginning. I learned new photoshop techniques and think they work to good effect.
EBI: What I could've done better was probably explored a few more ideas within the strands and perhaps challenge myself to come up with more novel framing mechanisms for the central reflections.
Overall I really enjoyed this task as it was an opportunity to create very cool and sometimes creepy images that I would maybe not have thought to have done if not for this task! I liked the idea of using these photographs to show different layers of perceptions and reality. Below you can see three of my favourite images from this task. Those are my final pieces. Although it was not my favourite project, as I much preferred the previous Force project.

Fredi - Select your best images from your Distortion shoot and then analyse them. With every shoot you do, in addition to identifying what the strengths are of your images, please identify how they could improve and what you could do differently next time. Did you create a work of art in paper and if not, I would remove the section on Tamara Lorenz. If you'd like to keep this, please create a piece of paper art that utilises these principles of reflected shapes in paper.
Move your Tom Hussey section above the Halloween shoot.
Great visit to the Olafur Eliasson exhibit and I love that you took photos within the exhibition. Please put this section above your final strand. You need to select 2 other strands - right now you only have a final strand. I'd like for you to experiment with 2 different areas of reflection for your other strands.
